Monday 4 May 2015

Evaluating Digital Imagery


For the final task for our digital imagery assignment, we were told to evaluate a couple of photographers images that have been edited with various different digital imaging techniques. After spending a few months focusing on our own personal skill and development within digital imagery in photography, it was now time to focus on other photographers work and the way they produce their images and what we could learn and gain from their unique techniques.

The first photographer I wanted to include within my evaluation of other photographers is Adde Adesokan. Not classed as a 'well-known' photographer, but I wanted to use someone that produces something different within their photography, and not just a photographer who follows the trends of others. Adde Adesokan is a self taught street and travel photographer, and I really wanted to focus on his series of images named, 'Triptychs of Strangers'. During our own assignment we touched on both street and triptych photography which ties in nicely with this photographer and series of images. Ever since producing my own triptych image, I have been fascinated with all the different types of triptych images around. I love the way Adesokan has used people as the pinnacle within his images, taking three separate personality matching body shots and making them one. Usually set out as landscape, he has set these out in portrait with the overall images being visually interesting and technically brilliant. Using this technique to his full potential, he has used a mixture of both colour and black and white to best suit the image. He also creates a story behind each series of images he produces, creating almost something that we can all relate to within atleast one image. Camera angles are also important and he takes into consideration what he wants to get across to his audience with the way he positions his camera and reveals what he only wants us to see with the use of natural lighting and the involvement of street photography as his simple yet effective backdrop. He doesn't necessarily use any fancy techniques on Photoshop to edit the image, instead he uses triptych as his main focus to produce creative images that stands out from anything else.
 
Below are three of my favourite triptych images from Adde Adesokan's Triptych portfolio


Secondly I wanted to include a fashion image that has been through the process of Photoshop. One of my favourite fashion photographers, Chris Nicholls produces the highest quality fashion shoots, with the sharpest and smoothest of images. The images that would be best to talk about for this evaluation process is a couple from my favourite selection from Flare Magazine and the edit, 'The New Wave'. These images have a very graphic design feel about them, in which Nicholls' has used levels to enhance the colours of the original image and smoothed the skin. He has also used the clone tool within Photoshop to clone the model and her outline whilst he duplicates the layer to create an extra two of the model. He has then placed these within the background each side of the original image of the model. I am not completely sure on how he has produced the duplicate copies as a block colour and used as pop art, but it really gives the image a very artistic feel about it which is perfect for advertisement and publication purposes.


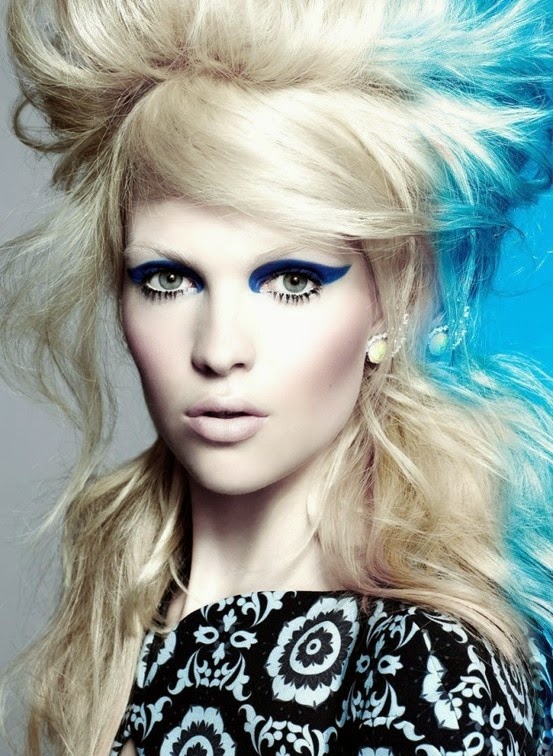
Again, cloning has been used for the last 3rd of the image, with a tint of blue. This gives an extra pop of colour to the very low saturated, almost black and white image, something very simple but sometimes its not always about using a variety of different edits or involving as much as you can within the image, something as little of a splash of colour as the shadow of the image is all that it needs. This is a very strong image, and I believe Nicholls didn't spend very long on editing it. With the model being lit up from all angles in the studio, rather than just from one side, it allows us to see each detail of the model and the image without any unnecessary shadowing or harsh lines. With the added brightness and levels he has used to bring out the darker colours in the models clothing against the very pale skin of the model allows him to keep the image how he first shot it without removing any of the natural texture of the hair and eyes.
 

Digital imagery and the use of Photoshop to create these techniques is used in many circumstances, whether that be for fashion, beauty purposes, magazine or advertisement publications, a landscape or a still life image, digital imagery is everywhere we look, but its what the photographer has used within post production of image editing that counts and that transforms an image by the technique being used.

Tuesday 21 April 2015

Digital Imagery - Montage

At the moment I am posting a lot of digital imagery blogs, due to the fact that they are all part of an assignment that I have been set, which is due in this week. One of the last imagery techniques that I am going to blog about is called, 'Montage'. I had never actually used montage before, as it is definitely more of a graphic design type of technique that is used, but I was very excited to get going with it to see what I could produce in a small amount of time.

Our task was to produce a triathlon poster that consisted of the three spots involved within a triathlon, swim, cycle and run. I'm quite a big sports fan so I wanted to use images that stood out for me and that would best represent the triathlon. The process of placing the images and fading them out to merge within the image was a challenge as I didn't want the three images to overlap too much, so I re-sized them and placed them all towards the centre which worked well. Because the background was blue, from using the swimming image as the main background, I wanted to incorporate blue into the other images to bring all the elements of the poster together as one.
 
 
My poster is below


I am really pleased with my final outcome and I feel I have produced a poster that promotes the triathlon aswell as showing the work and the specific techniques that have gone into creating a poster like this. I have always loved the art and design side of photography or other creative means, which I put into practice here to produce a poster that incorporates montage in my own individual way.

Sunday 19 April 2015

Spring Time

As spring has now arrived, I thought I'd photograph something that represents spring to us all.

Flowers!

Now that winter is leaving us, flowers start to appear everywhere, especially around my house. I have a beautiful blossom tree that grows in my front garden, and this year its grown a month early, aswell as some tulips that have grown underneath! So I thought id take the opportunity in taking my camera out the house with me and photographing these lovely flowers before they start to disappear... and whilst the sun is still shining!

I used my Nikon with just my kit lens (18-55) for these images, as that was what worked best for me and I felt I got the best images from shooting with this specific lens. Below are some of my favourite images that include both detail and colour, aswell as natural lighting and depth of field.


Thursday 16 April 2015

Digital Imaging - Pseudo HDR

After creating my HDR (High Dynamic Range) images, we were also told to look at Pseudo HDR, which i guess in a way, is the cheat version of HDR photography. HDR is the technique of using various images to produce one final outcome with 1 underexposed image, one normal exposed image and one over exposed image. Although this is only limited to 3 frames, you are able to use as many frames as you want to get the desired outcome. Comparing this to Pseudo HDR, which is the technique of using just one image or frame and creating HDR within it. So in other words, Pseudo HDR is the easy way of creating a HDR effect..!!

I have already created my HDR images for that specific technique and weekly task, so I thought it was time I tried out just using Pseudo HDR to see the difference in effect on the image and if it worked just as well if I were to use 3 frames, rather than just the 1.


The image below is my original image, taken by using just the natural light, at 400 ISO and F11 and the aperture at 4.2. I shot in RAW to capture the detail within the landscape and environment around it, to give it a clear, crisp image and so I had a lot to work with when creating a Pseudo HDR image. I really like the way this image as come out, it makes a nice image of its own, but lacks colour and contrast aswell as some of the detail that needs to be recovered.


If we compare the original image to the one below, there is a lot of difference. Below is my edited Pseudo HDR image. I have purposely edited this to quite a large extent to show you what Pseudo HDR can do to an image of just one single frame. I popped this image into Photoshop and started to create my HDR image using specific techniques to make it look the way it does. I used specific techniques such as increasing the contrast, brightness and saturation to remove the dullness of the image. I then used levels and  highlight and shadow recovery with increasing the midtones of the image slightly to recover as much detail as possible lost in the original image and really make each part of the image stand out.


I am so pleased with how my final image looks and its amazing what you can do to an image by using just one single frame. This image could pass as a normal HDR image with the merging of many images, rather than the cheat way of Pseudo HDR!

Sunday 29 March 2015

Tim Burton Style Photoshoot

 
On Friday, Some of the Media Make-Up students had a final project to complete, which was producing something in the style of Tim Burton. There were around 15 students, which meant 15 models to shoot, all relating to different themes and unique ideas. When I first started working with the media make-up students, it was definitely and very new and interesting experience. With the students being on the same floor as us, we are able to easily contact one another with help for photographing for their portfolios and the MUA to produce any request of make-up we need for our personal photo-shoots. After looking through my images when I got home, there were a certain set of images that really stood out for me and they were the strongest images from the bunch I had previously shot. Named, 'The Skeleton', I was really excited about shooting this specific model because it was the model that most stood out for me. I don't know whether it was because she was dressed in all white against a black backdrop or because of the attention to detail of the transformation, but it was definitely the transformation that was definitely my favourite.

I edited my images only very slightly, just to bring the detail out on the skin and to really emphasise the hair and each strand that was out of place. I am so pleased with how these images have come out, after quite a long afternoon, and this was the last model to be shot, it was definitely worth the wait to capture these stunning images, for not only my benefit but to do the work of the MUA justice through these images.


I hope you love these images as much as I do!

X

Thursday 26 March 2015

Digital Imaging - Iconic Image

I have been struggling for a while to think of how I can re-create an iconic image. I have spent days thinking of what image would be good to re-create and that has some meaning behind it. After a good old think, I actually came up with the idea of re-creating or capturing an image from Harry Potter. Being a big fan of all things Harry Potter and my generation being the generation growing up with it when I was little, it was sort of something that was part of my childhood, going into my teenage years, and that was also close to home.

Parts of the first two films of Harry Potter were filmed in Lacock, and with it only being a 5 minute drive from where I live, back in 2001 and 2002, my family and I spent hours in Lacock on the evenings it was being filmed to see if we could get a glimpse of some of the cast. I saw a couple of heads, but it was hard to see a lot with everyone else trying to catch a glimpse of the cast, but a couple of heads was enough for me, just to even say I was there was definitely an experience!!

Some of the very first scenes of Harry Potter were filmed in the centre of Lacock, and I wanted to capture a moment that was very iconic in the film. So I decided to pick rather than inside the Abbey where classroom scenes were filmed, I was going to shoot the house of Harry Potters parents and the scene of the exterior.

The image below is the original image in the film (sorry its not very clear!!)


And here is my image (taken in the day!)


For this image below, I tried to use my shadow as the shadow of 'Voldemort' to get it as close as possible to the original image.


I also shot other significant buildings which made an impact in the film, which were Lacock Abbey and Cantax House, used in the Half Blood Prince  as Prof. Slughorns house.


If you ever get the chance to go to Lacock or if you are just passing by, its a lovely small historic village that is so nice to walk round. I hope you like my images as much as I do.


X

Wednesday 25 March 2015

Digital Imaging - HDR

Another digital imaging task up on my blog today, this time its HDR photography - in other words 'High Dynamic Range' photography. HDR is a process and technique in photography that combines either one image, or a series of images in which they are merged together and adjusted, by changing and improving the contrast ratios, which are impossible to produce through a single shot image and its aperture and shutter speed. HDR photography is in a sense, images merged together to create one. But these images are of the same scene, but all at different shutter speeds. It can range from 1 image, to anything around 10 of the same image but all of different exposures. In other words, an overexposed image, a normal exposed image and a underexposed image. Once we pop these images into Photoshop, the process should bring out all the detail from the shadows and highlights that would be impossible to shoot from just one single shot from the lens, from all three images bought together to create a scene or a final image that really produces a striking and intricate photograph.

I actually used an image I shot from Buscot Park last year as it looked like the perfect image to work with when producing a HDR image. I created my final image from 4 different images, one underexposed, one overexposed, one unedited image and one which I just increased the brightness and contrast slightly so I had 4 images to work with.


To create something that looked like this...


I am very pleased with this image, apart from the sky which I think looks too edited and almost like a painting, so I need to practice getting the detail balanced well on all parts of the image to make it look detailed as a whole. But other than that I couldn't be happier with my final image. The detail on the grass is amazing and I cant believe how different this image looks from my single images above and what it can produce when combining images together. I cant wait to be using more of this technique in my work and it was a technique I was definitely most excited about trying out after being set the task!


Until next time guys! :)

x